
Onboarding
Set up your first WitCloud project - create it, pick your integrations and go through the seven onboarding steps, on your own or with your AI assistant.
Updated
This page takes you from a new account to a project with data flowing: you create a project, pick the systems you use, and then go through seven setup steps. You can do them yourself or let your own AI client do them with you - and switch between the two at any point.
Before you start
- A WitCloud account. Register here. It works best when one person creates the account and the project, and then invites the rest of the team (Team).
- A Google Cloud project with an active Billing account - WitCloud stores your data in your own Google Cloud project. If you do not have one yet, the setup shows you how to create it.
- Permission to grant roles in that Google Cloud project (IAM).
Create your project
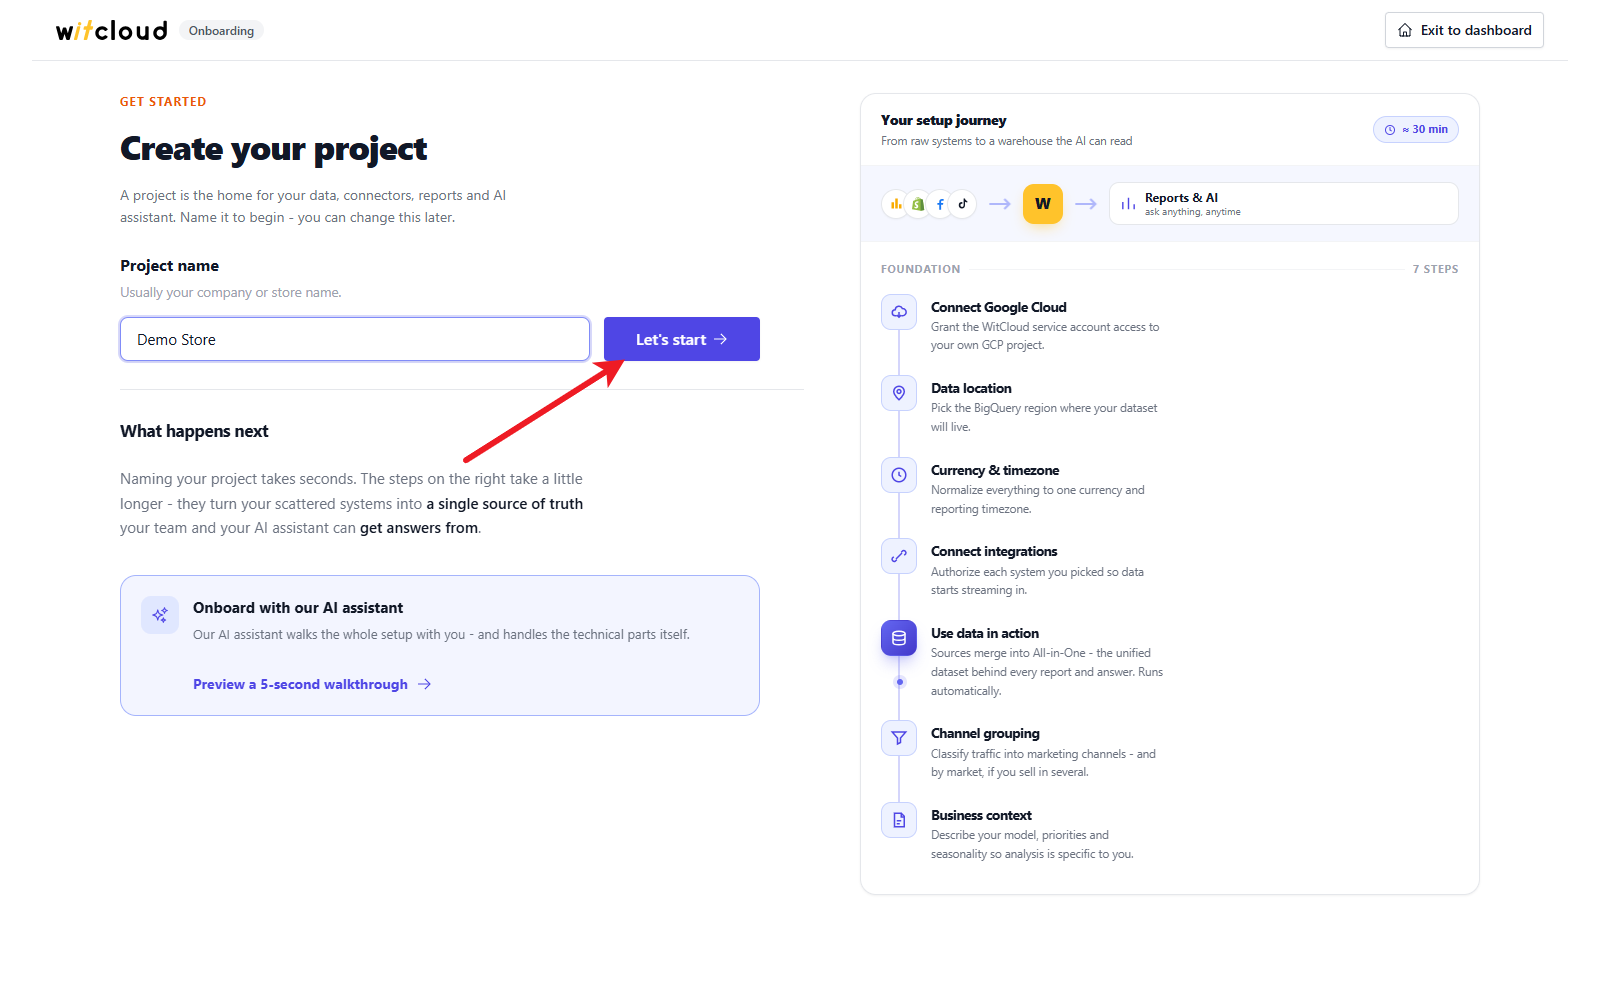
After you sign in for the first time, you see Create your project. A project is the home for your data, connectors, reports and AI assistant.
- Enter the Project name - usually your company or store name. You can change it later.
- Click Let's start.
Pick the integrations you use
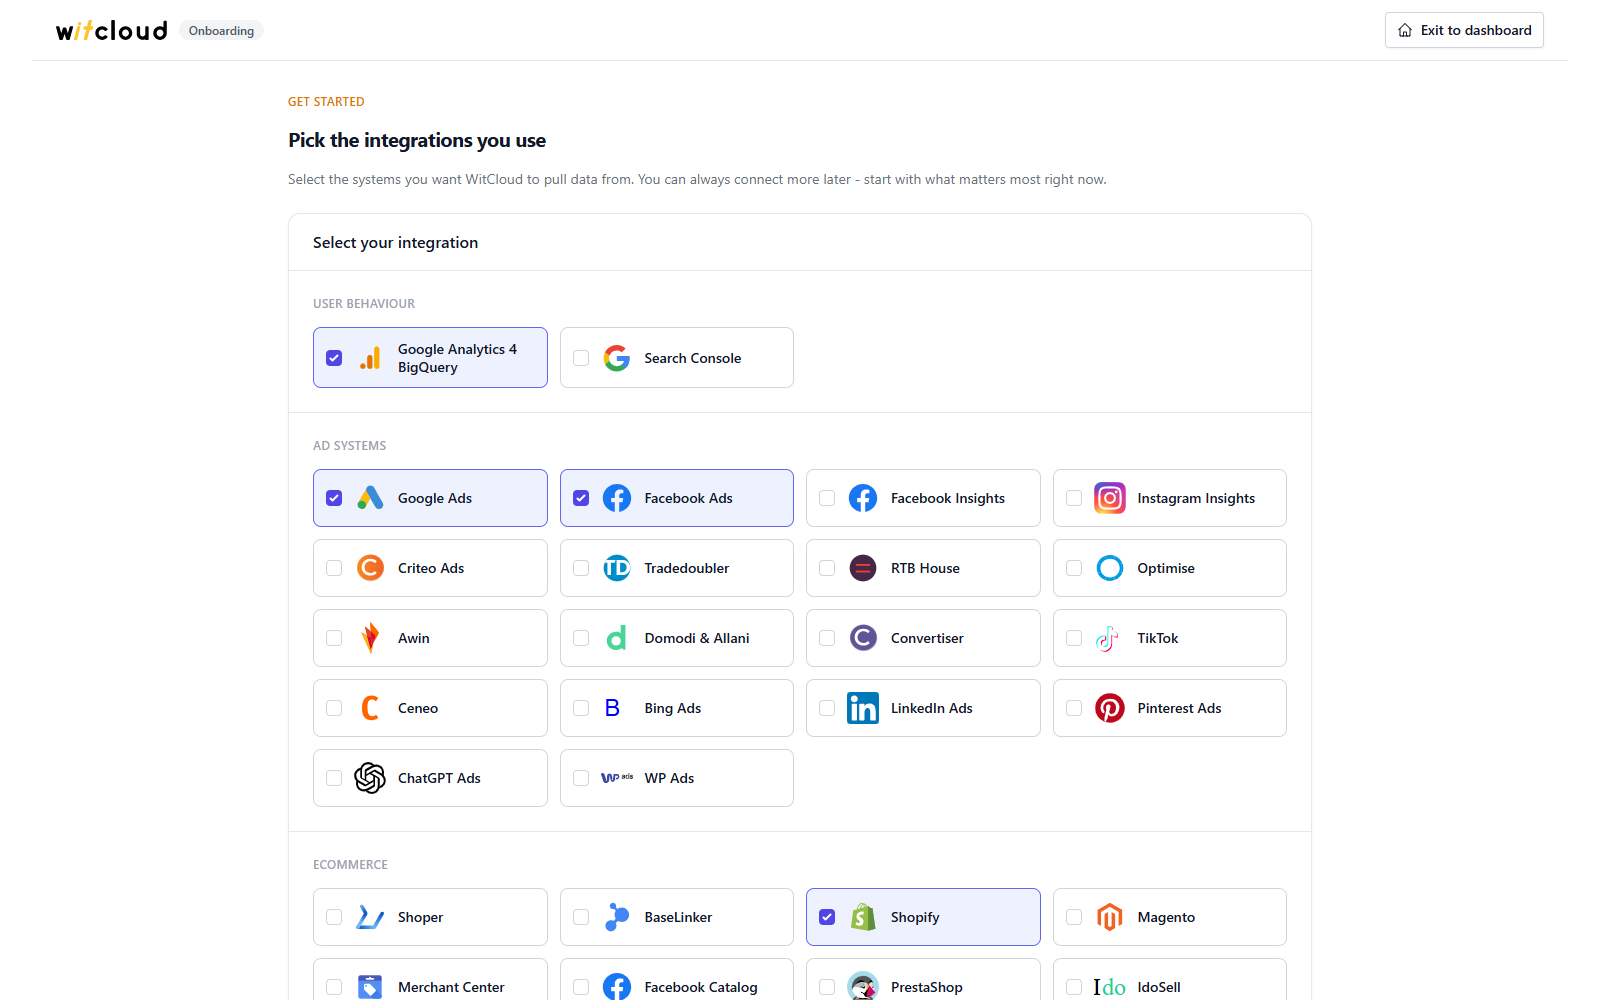
Select the systems you want WitCloud to pull data from, then click Next at the bottom of the list. You have to select at least one. This is only your plan - nothing is connected yet, and you can add more integrations later.
Choose how to set it up
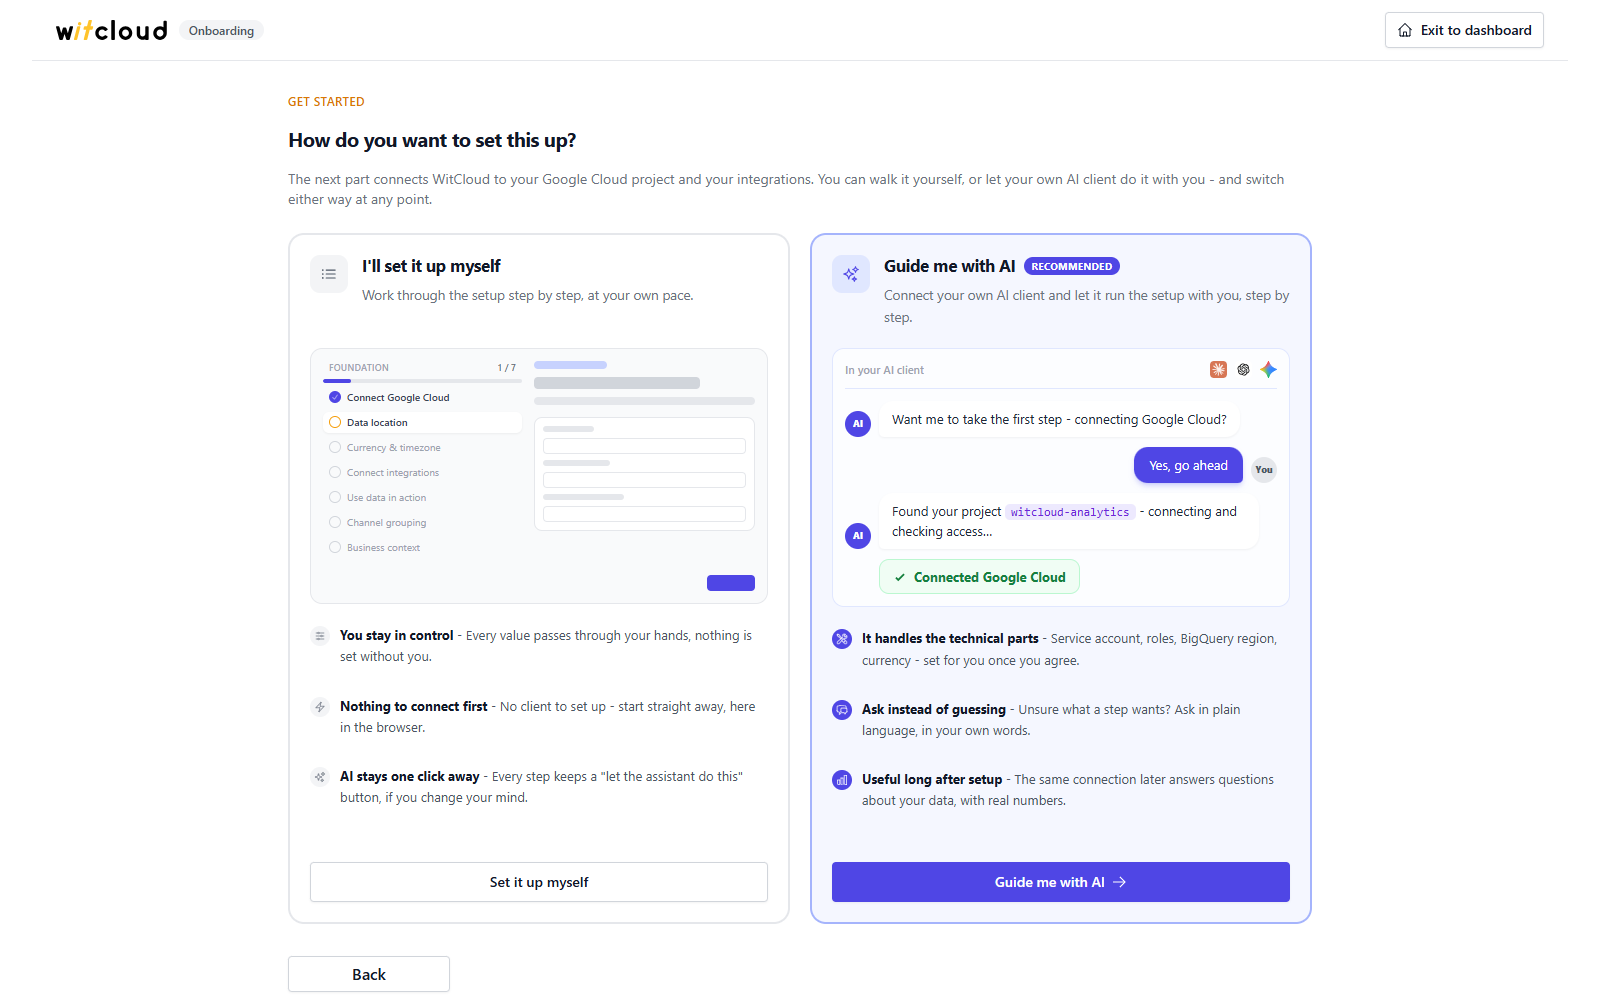
Next, choose how you want to go through the setup:
- Set it up myself - work through the steps at your own pace, here in the browser.
- Guide me with AI - connect your own AI client (Claude, ChatGPT or Gemini CLI) to WitCloud and let it run the setup with you. It explains each step, sets values such as the BigQuery region and the currency once you agree, and checks the result.
Connect your AI client
If you chose Guide me with AI, pick your client. The panel shows the steps to connect it to WitCloud - a one-time connection. Any client that supports MCP works: pick the closest guide, the connection address is the same everywhere. Then click Start onboarding.
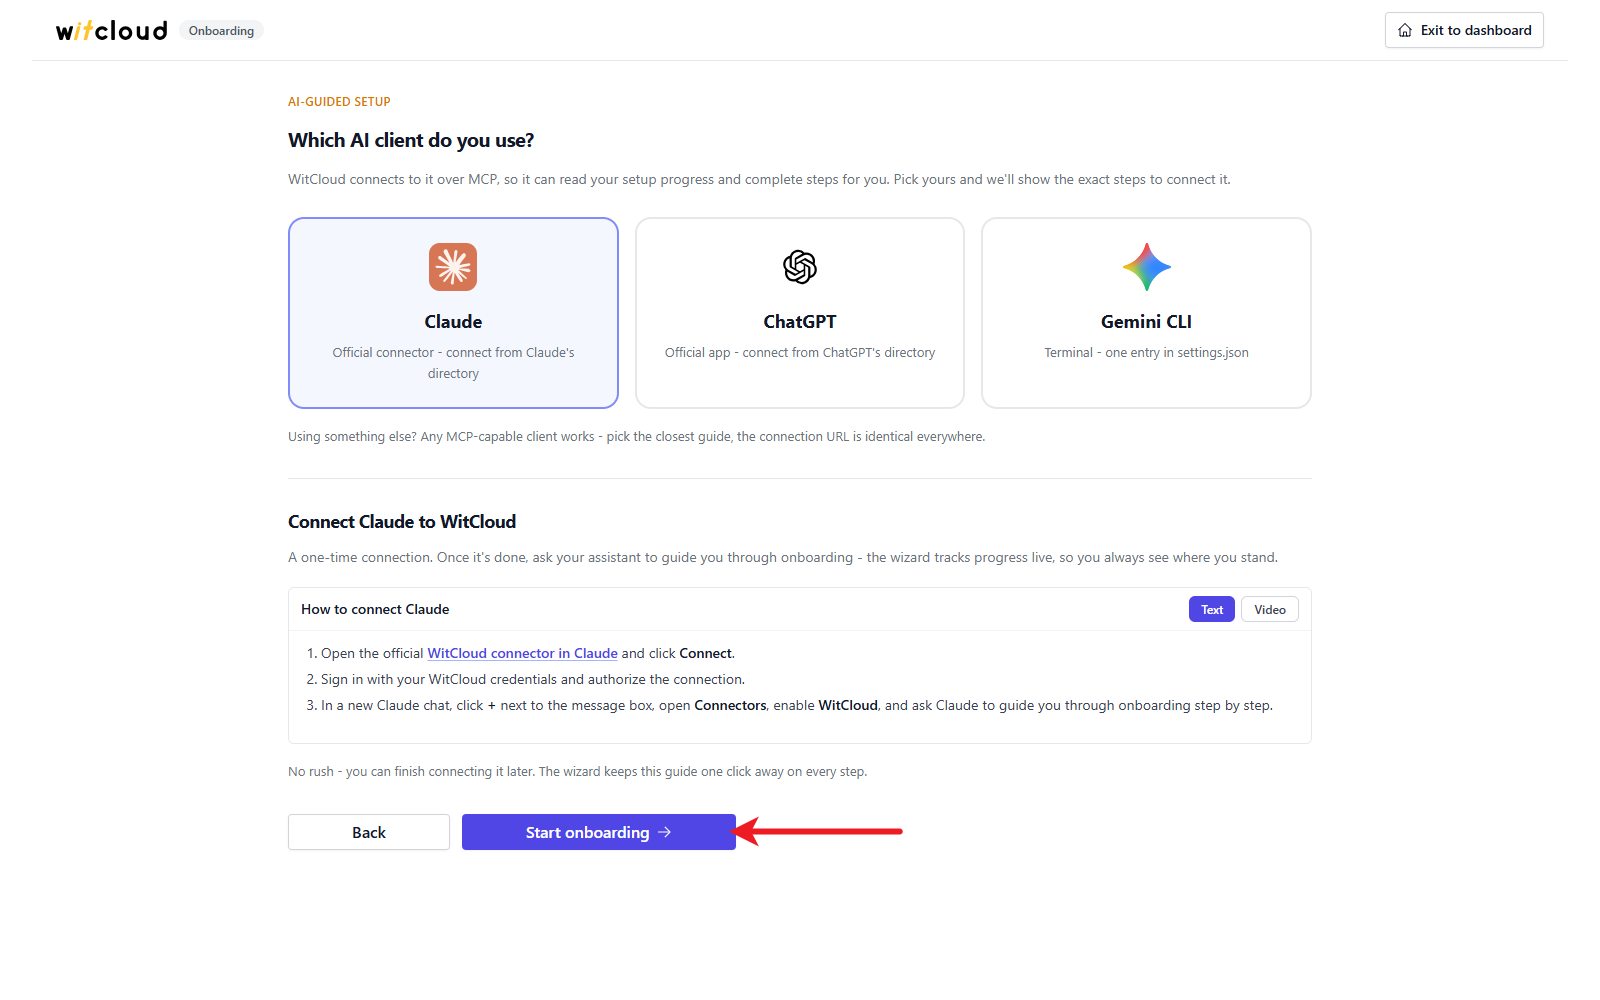
Once your client is connected, ask it to guide you through onboarding. You can also finish connecting it later - every step of the setup has a Connect assistant button. More about the connection: WitCloud MCP.
The setup wizard
The setup has seven steps, listed on the left with your progress. Completed steps are ticked; you can go back to any completed step or the current one, while the steps after it open as you get to them.
- Next saves the step and takes you to the next one. Back goes one step back.
- Connect assistant in the box at the top of each step opens Connect your AI assistant: pick your client, follow the steps to connect it, and paste the starter prompt into it. The assistant can then do that step with you.
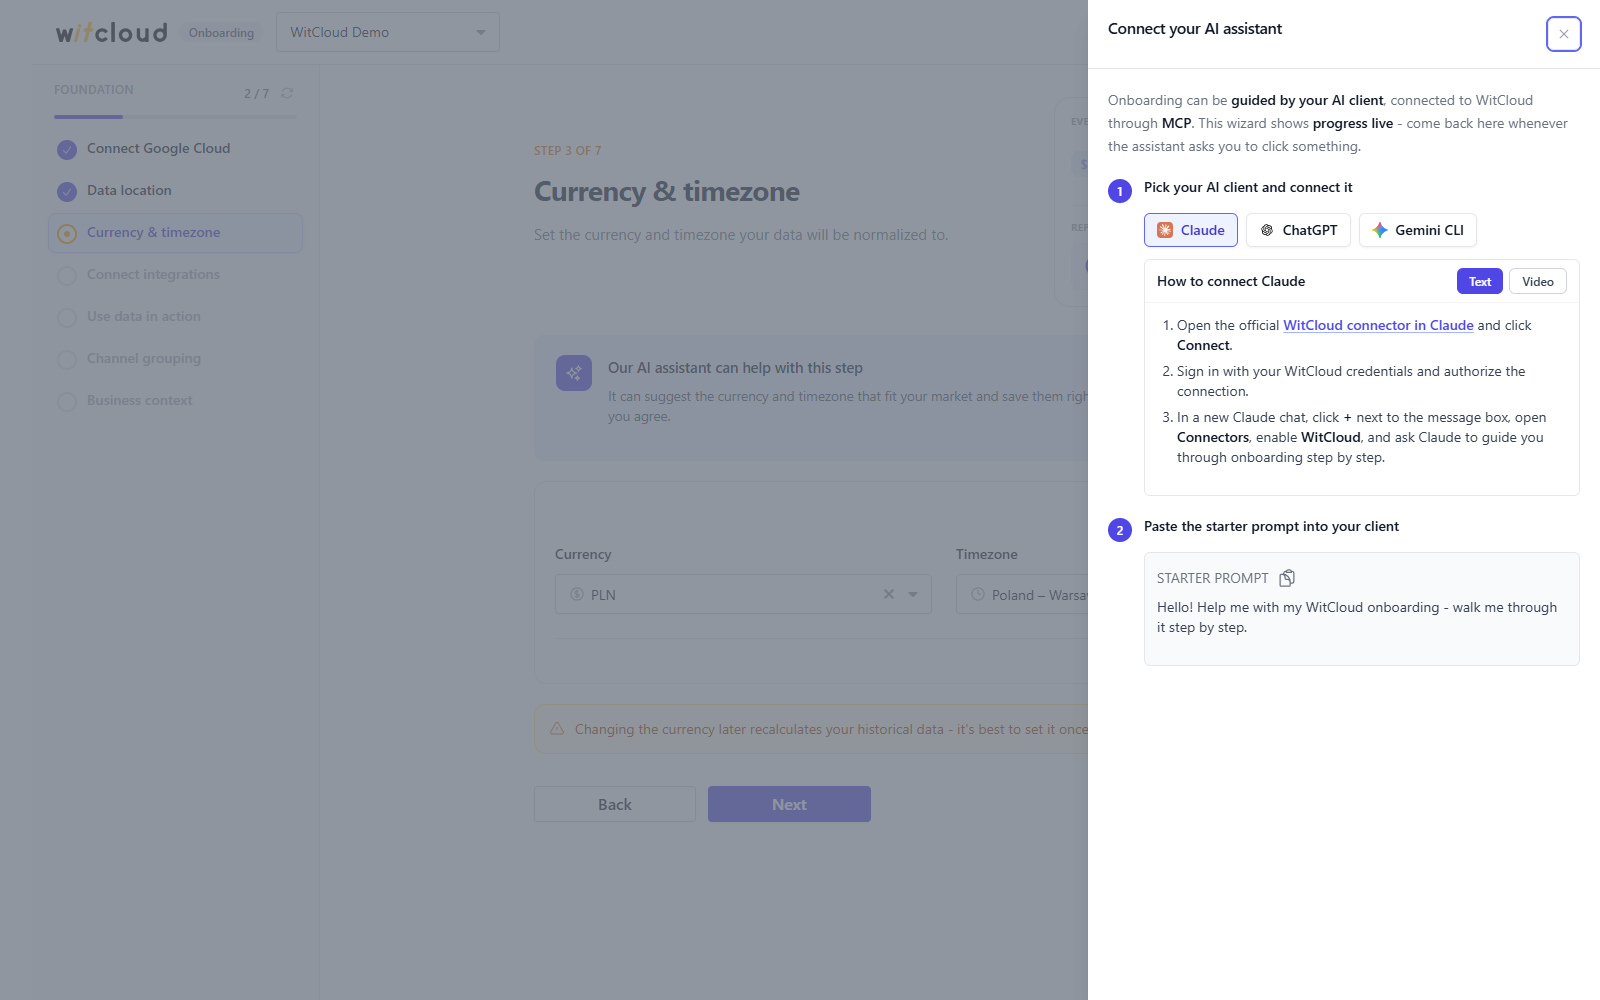
- When your AI assistant completes a step, the wizard updates on its own and shows Your AI assistant made progress. The refresh icon next to the progress counter reloads it by hand.
- You can leave at any time and come back later - the wizard resumes where you stopped.
The rest of the panel unlocks once the first two steps - Connect Google Cloud and Data location - are done. Until then the button in the top right corner is Sign out; afterwards it is Exit to dashboard.
Step 1: Connect Google Cloud
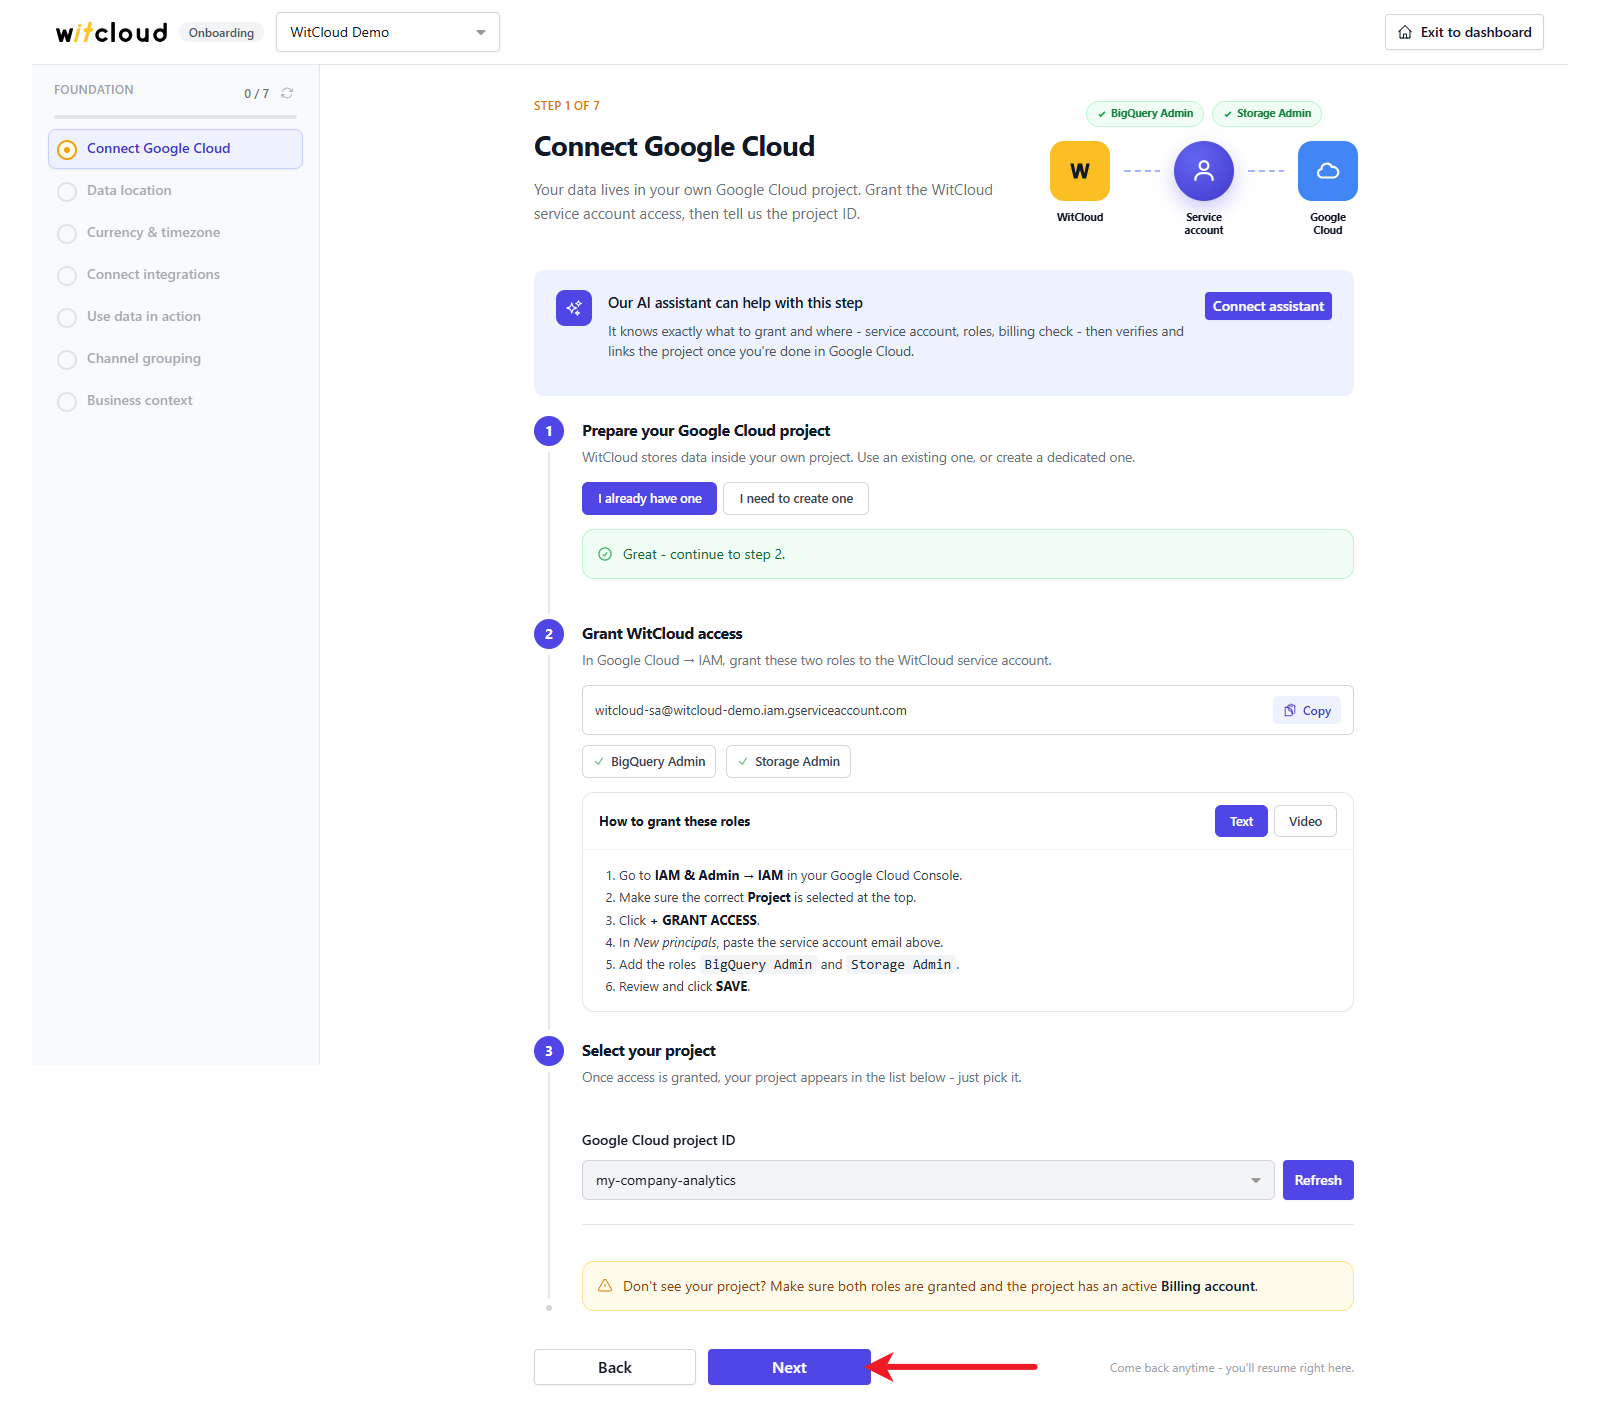
WitCloud stores your data in your own Google Cloud project, so it needs access to it.
- Prepare your Google Cloud project - choose I already have one or I need to create one. The second option shows How to create a project, as text or video.
- Grant WitCloud access - copy the WitCloud service account with Copy. It needs two roles in your project: BigQuery Admin and Storage Admin. How to grant these roles shows the steps, as text or video.
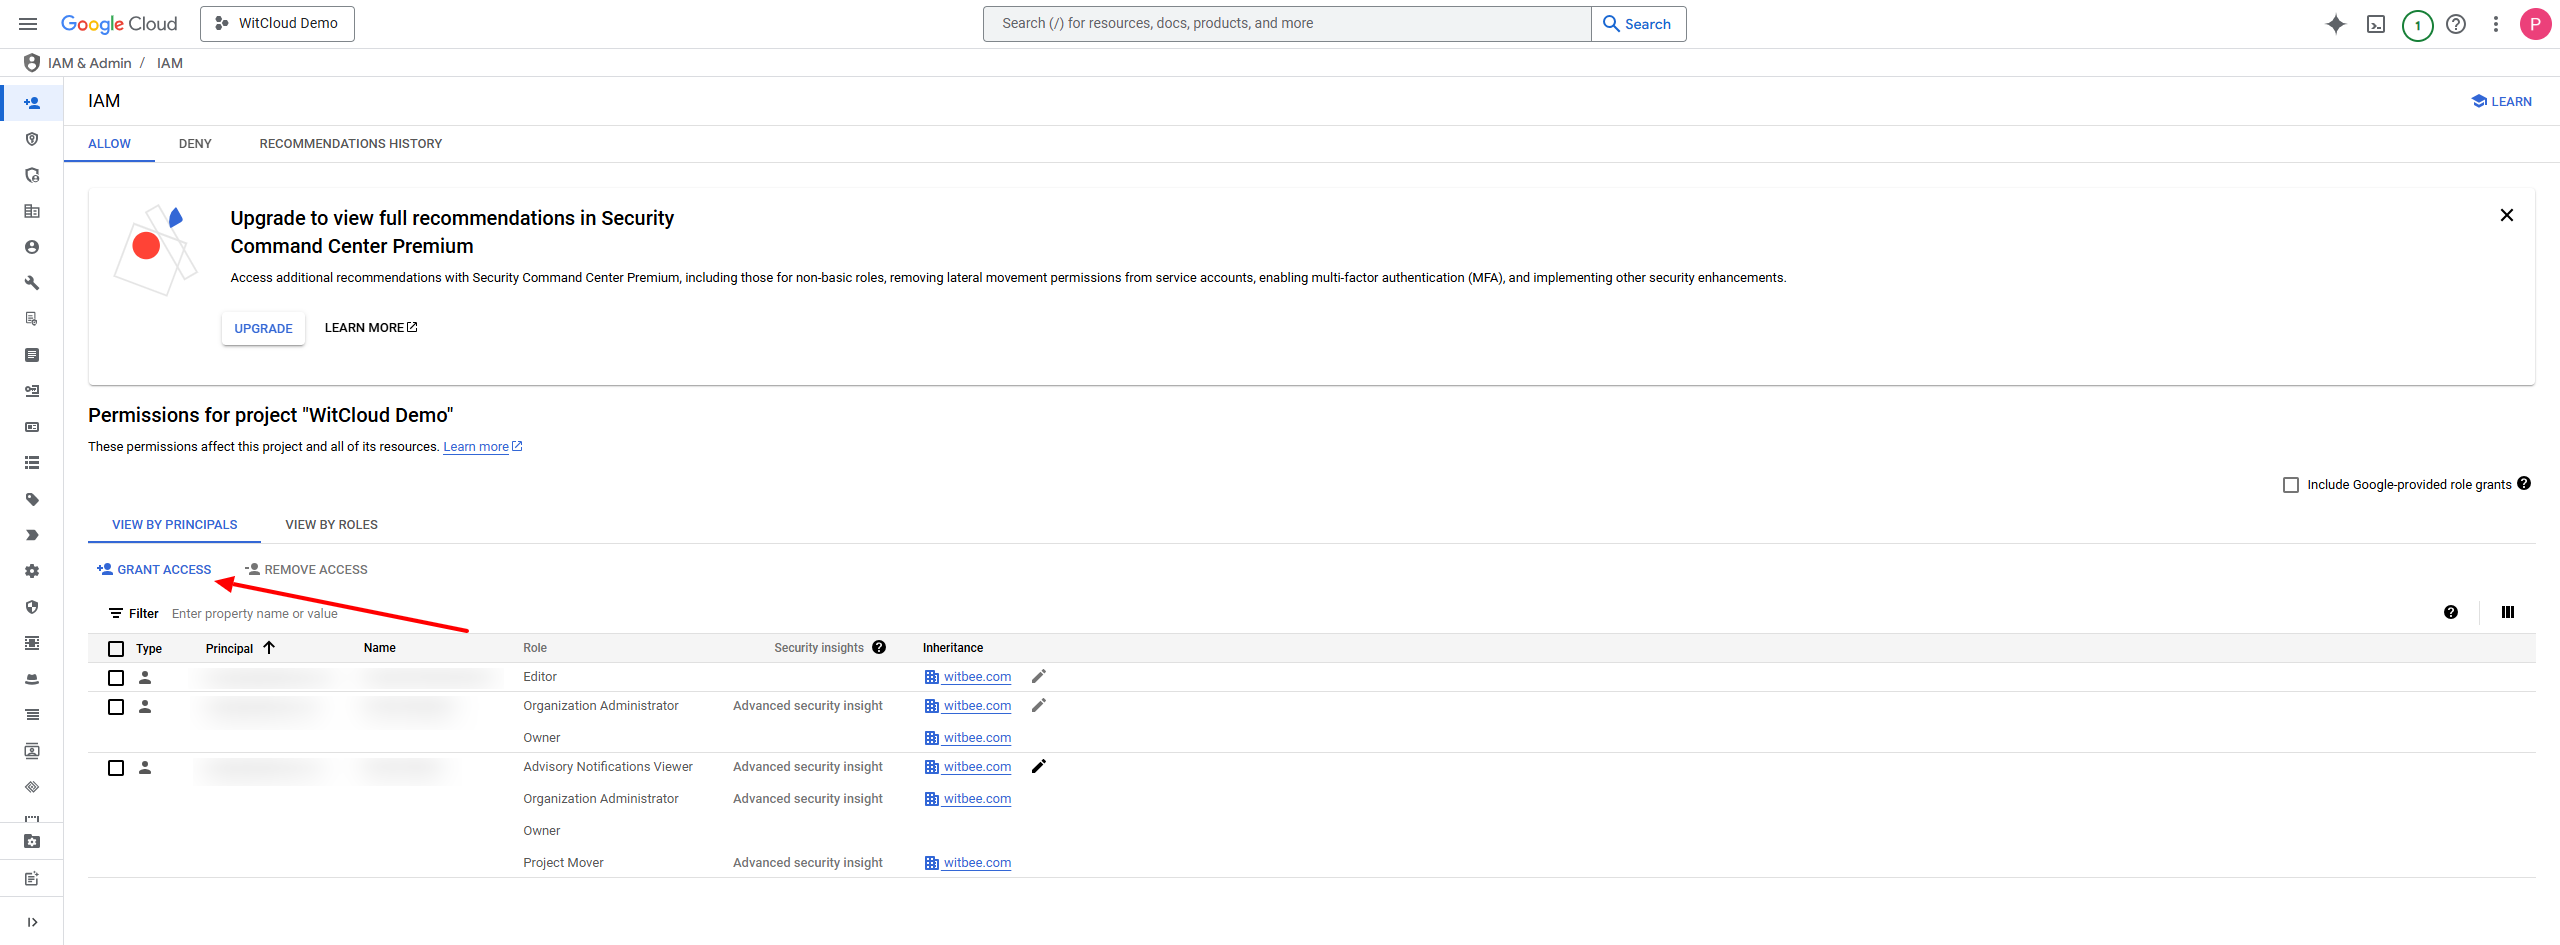
In the Google Cloud console, go to IAM & Admin > IAM in your project and click Grant access.
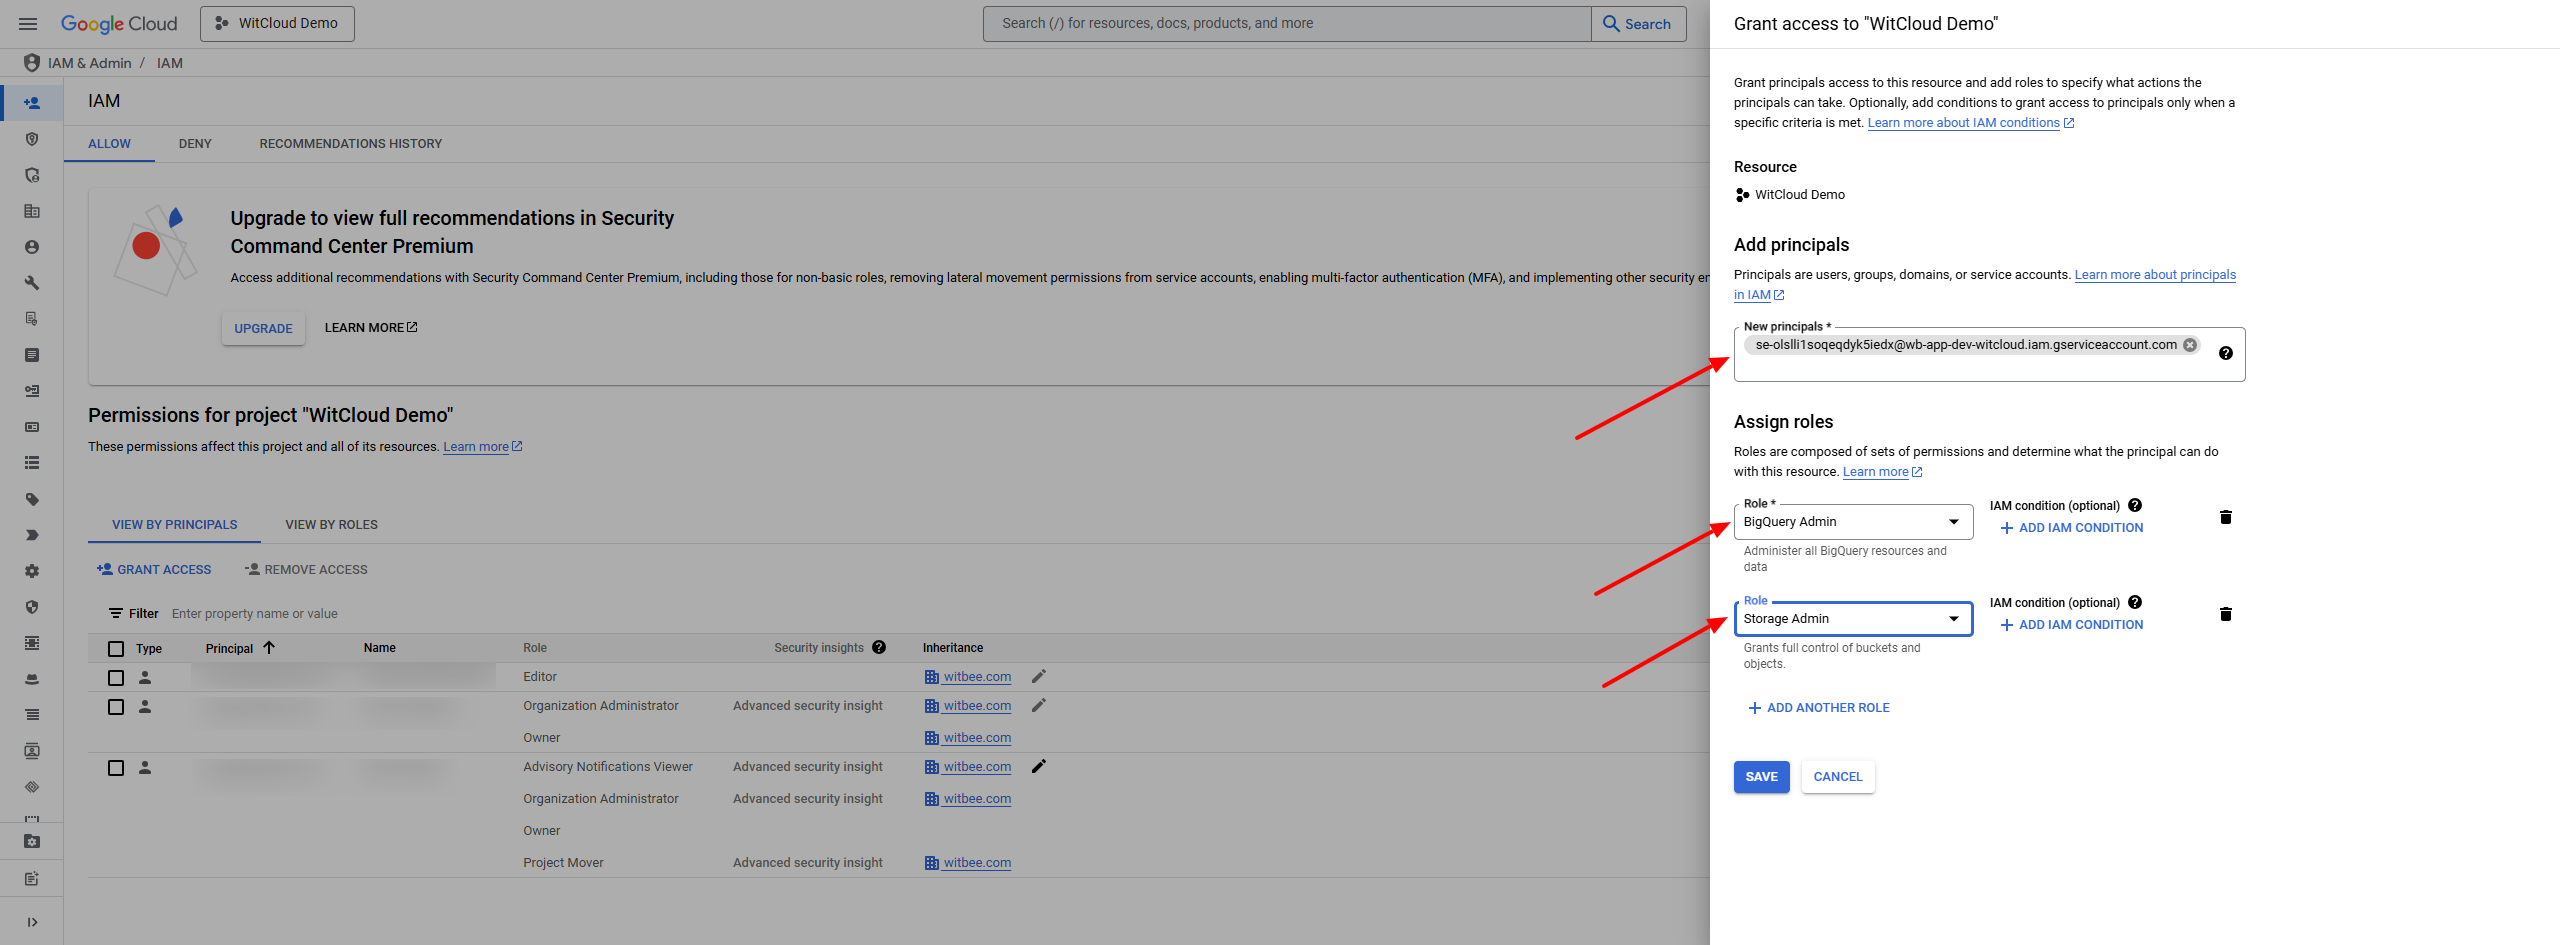
In New principals, paste the WitCloud service account. Add the roles BigQuery Admin and Storage Admin, then click Save.
The service account now appears in the access list with both roles.
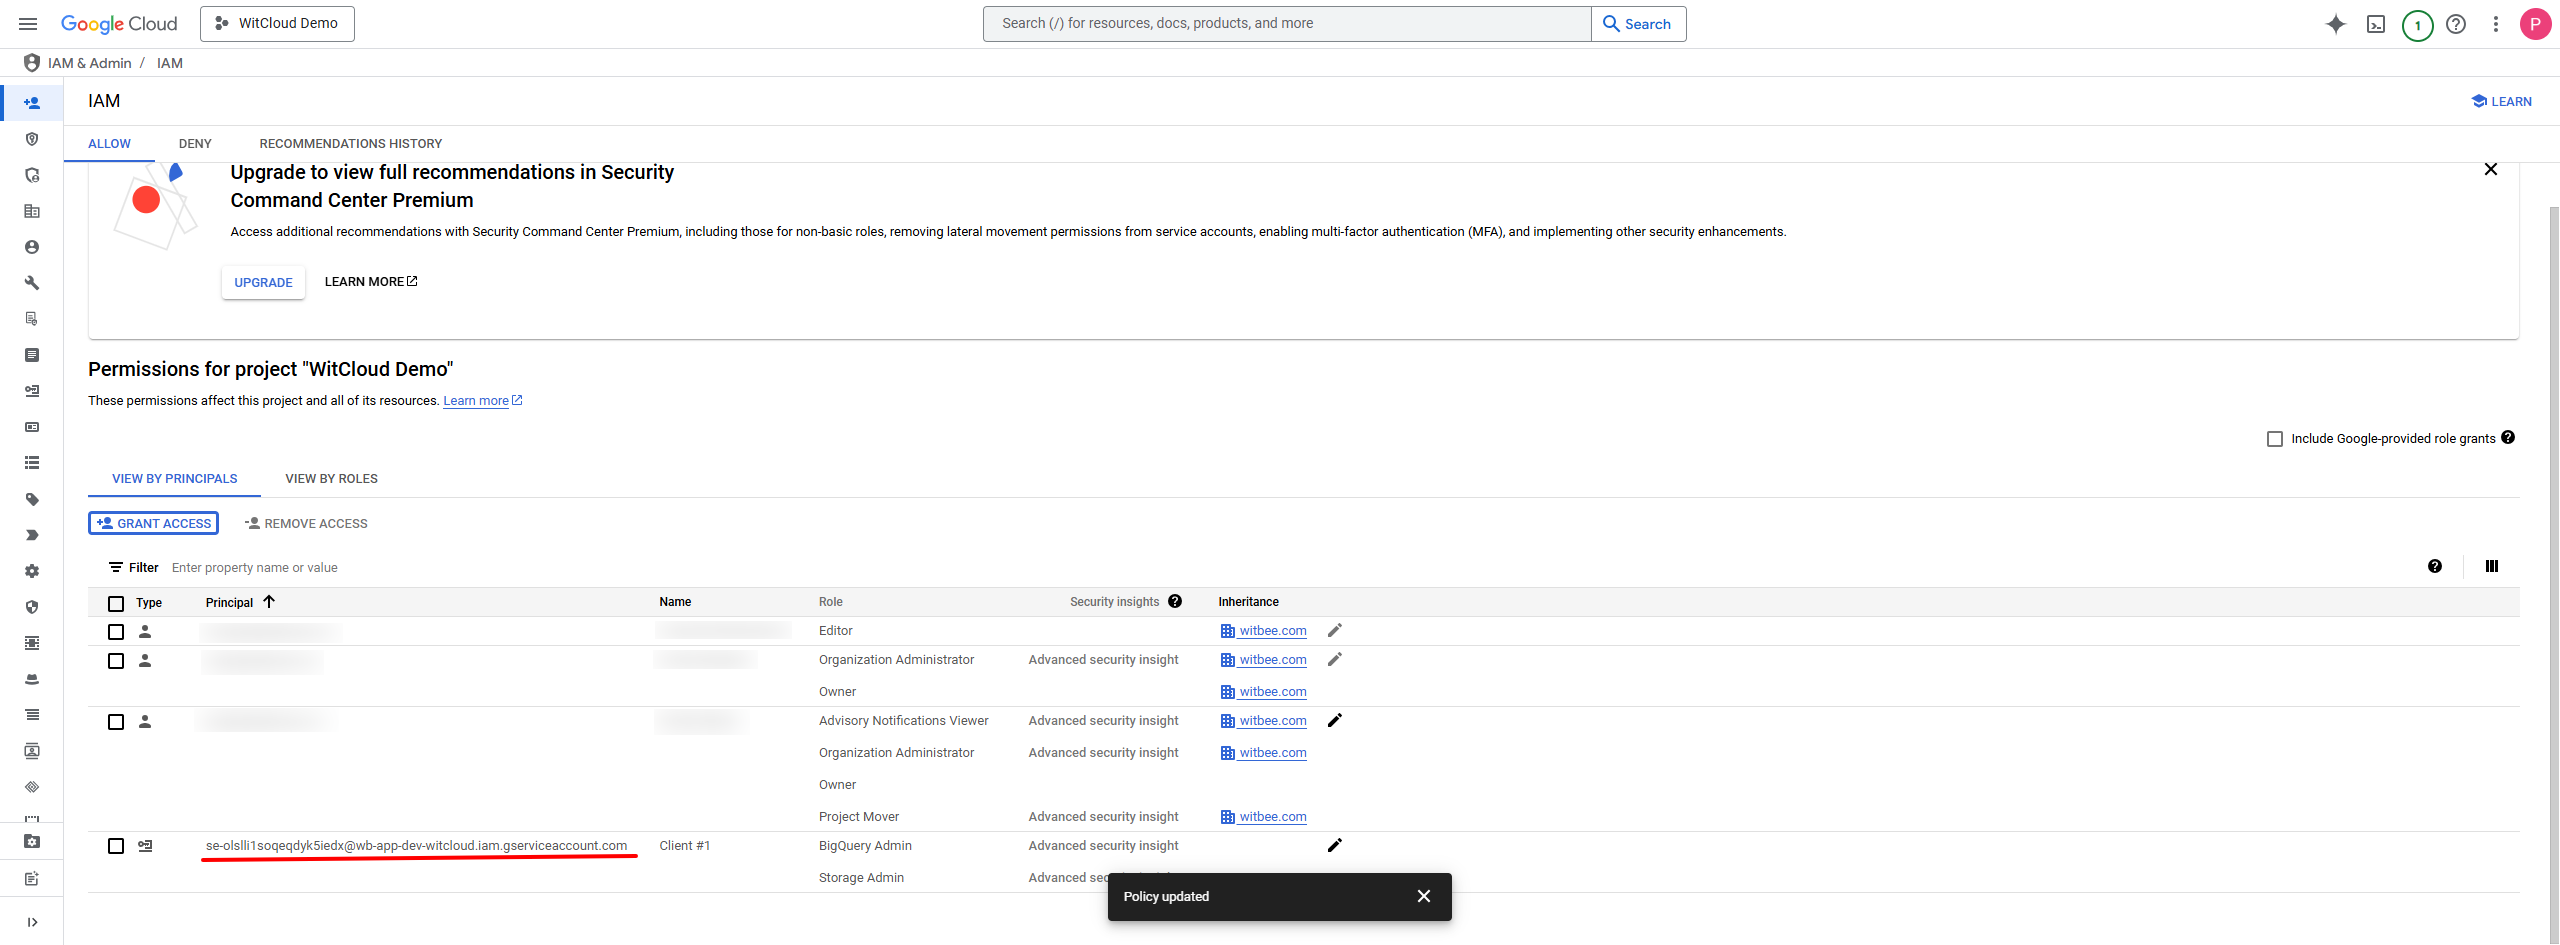
- Select your project - back in WitCloud, pick your project in Google Cloud project ID. If it is not there yet, click Refresh. Then click Next; WitCloud checks that it has both roles before moving on.
Don't see your project? Make sure both roles are granted and the project has an active Billing account.
Step 2: Data location
Choose the BigQuery region where your WitCloud dataset will live.
- Do you already have data in BigQuery?
- Yes, I have data in BigQuery - pick the same region your existing data uses, for example your GA4 BigQuery export, otherwise the two cannot be joined. How to check the region of your GA4 BigQuery export shows where to find it.
- No, I'm starting from scratch - pick the region closest to where your business operates; it matters for GDPR and data residency. Mainly in Europe: an EU region. In the US: a US region.
- Select your data location - choose the region in Location and click Next.
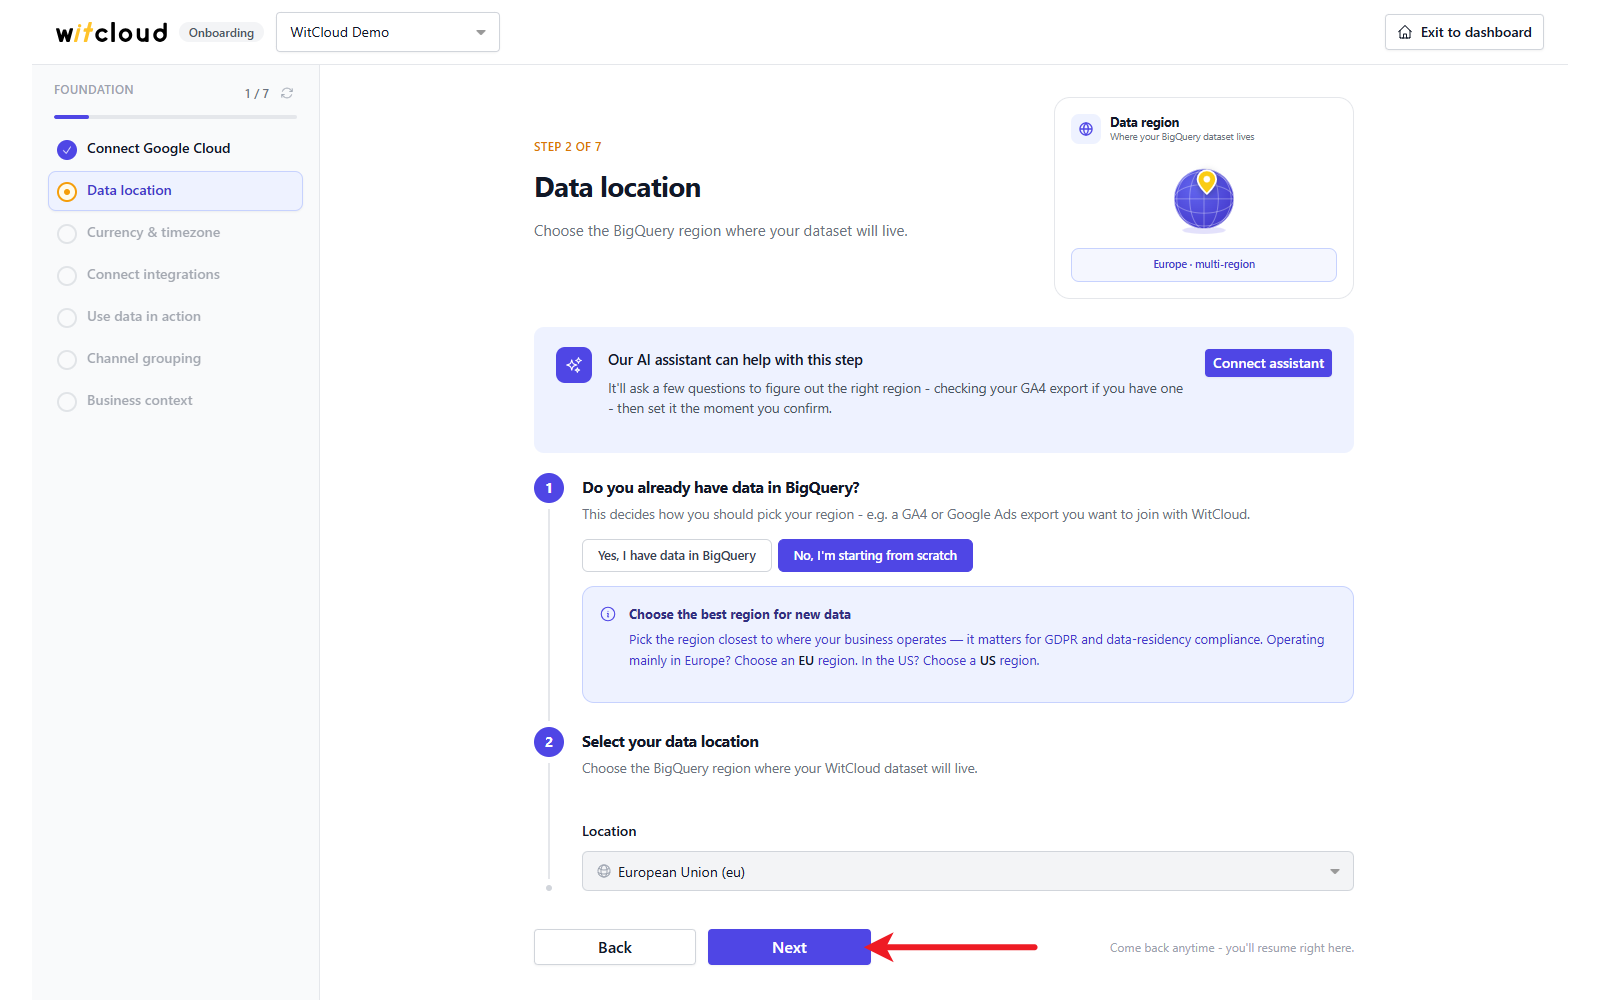
The location cannot be changed later.
Step 3: Currency & timezone
Choose the Currency and Timezone your data is normalized to, then click Next. Saving this step also switches on All-in-One for the project - the unified dataset your reports and the AI assistant use.
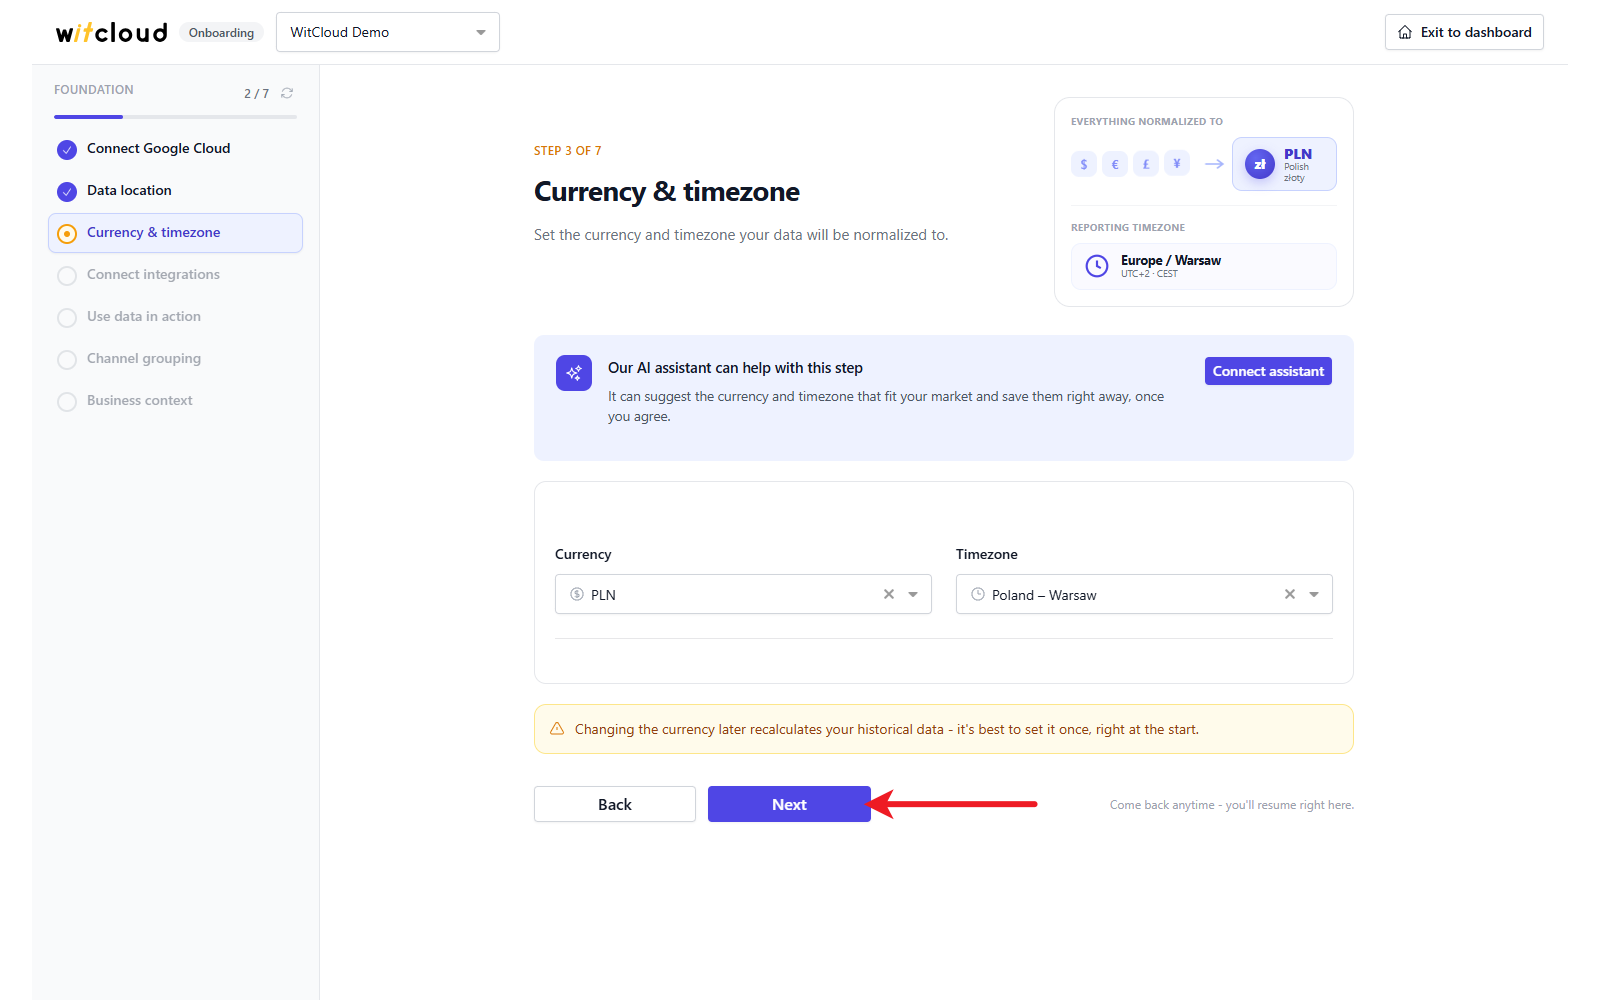
Changing the currency later recalculates your historical data - set it once, at the start.
Step 4: Connect integrations
This step lists the integrations you picked earlier.
- Connect opens the integration's setup. When you finish it, you come back here and the integration shows Connected. Add account connects one more account of the same system. Each integration has its own page under Integrations.
- Add another integration takes you back to the list of systems; after you pick more, you return here.
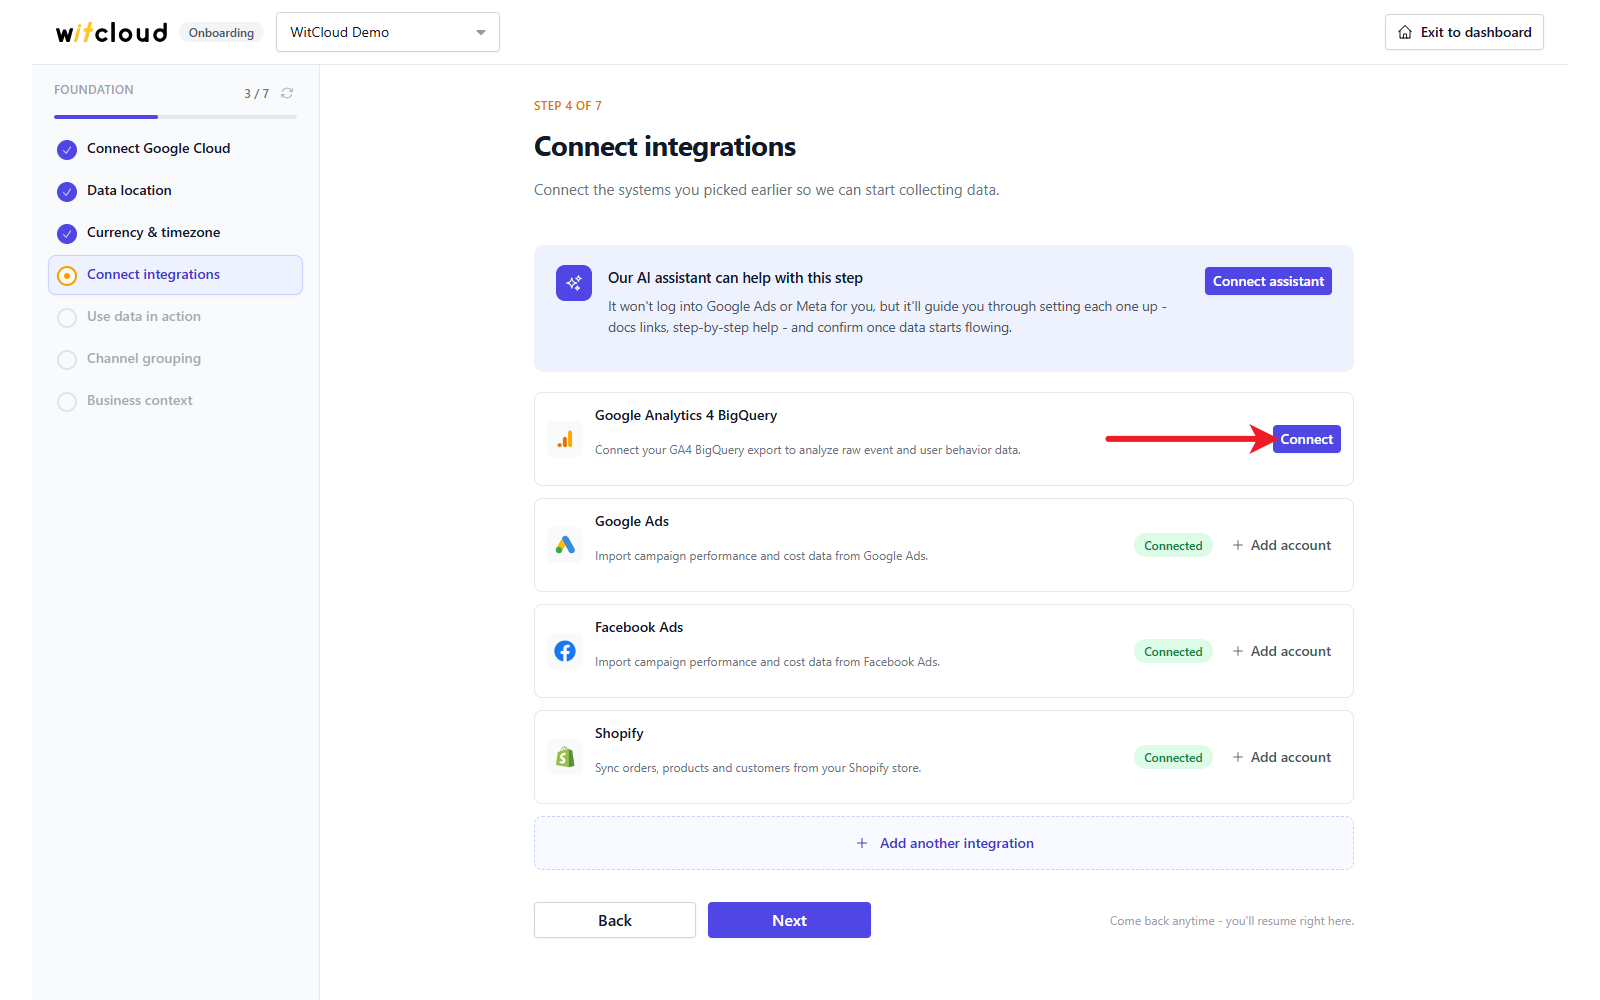
Click Next once at least one integration is connected.
Step 5: Use data in action
Your connectors' data is now being combined into All-in-One. Historical data load shows how far each connector is with loading the history you set: BACKFILLING while it runs, COMPLETE when it is done; Show next to By connector lists the progress of each connector. It runs in the background - you can leave and come back. The progress refreshes every 20 seconds, and Next completes the step once the first data has landed in All-in-One.
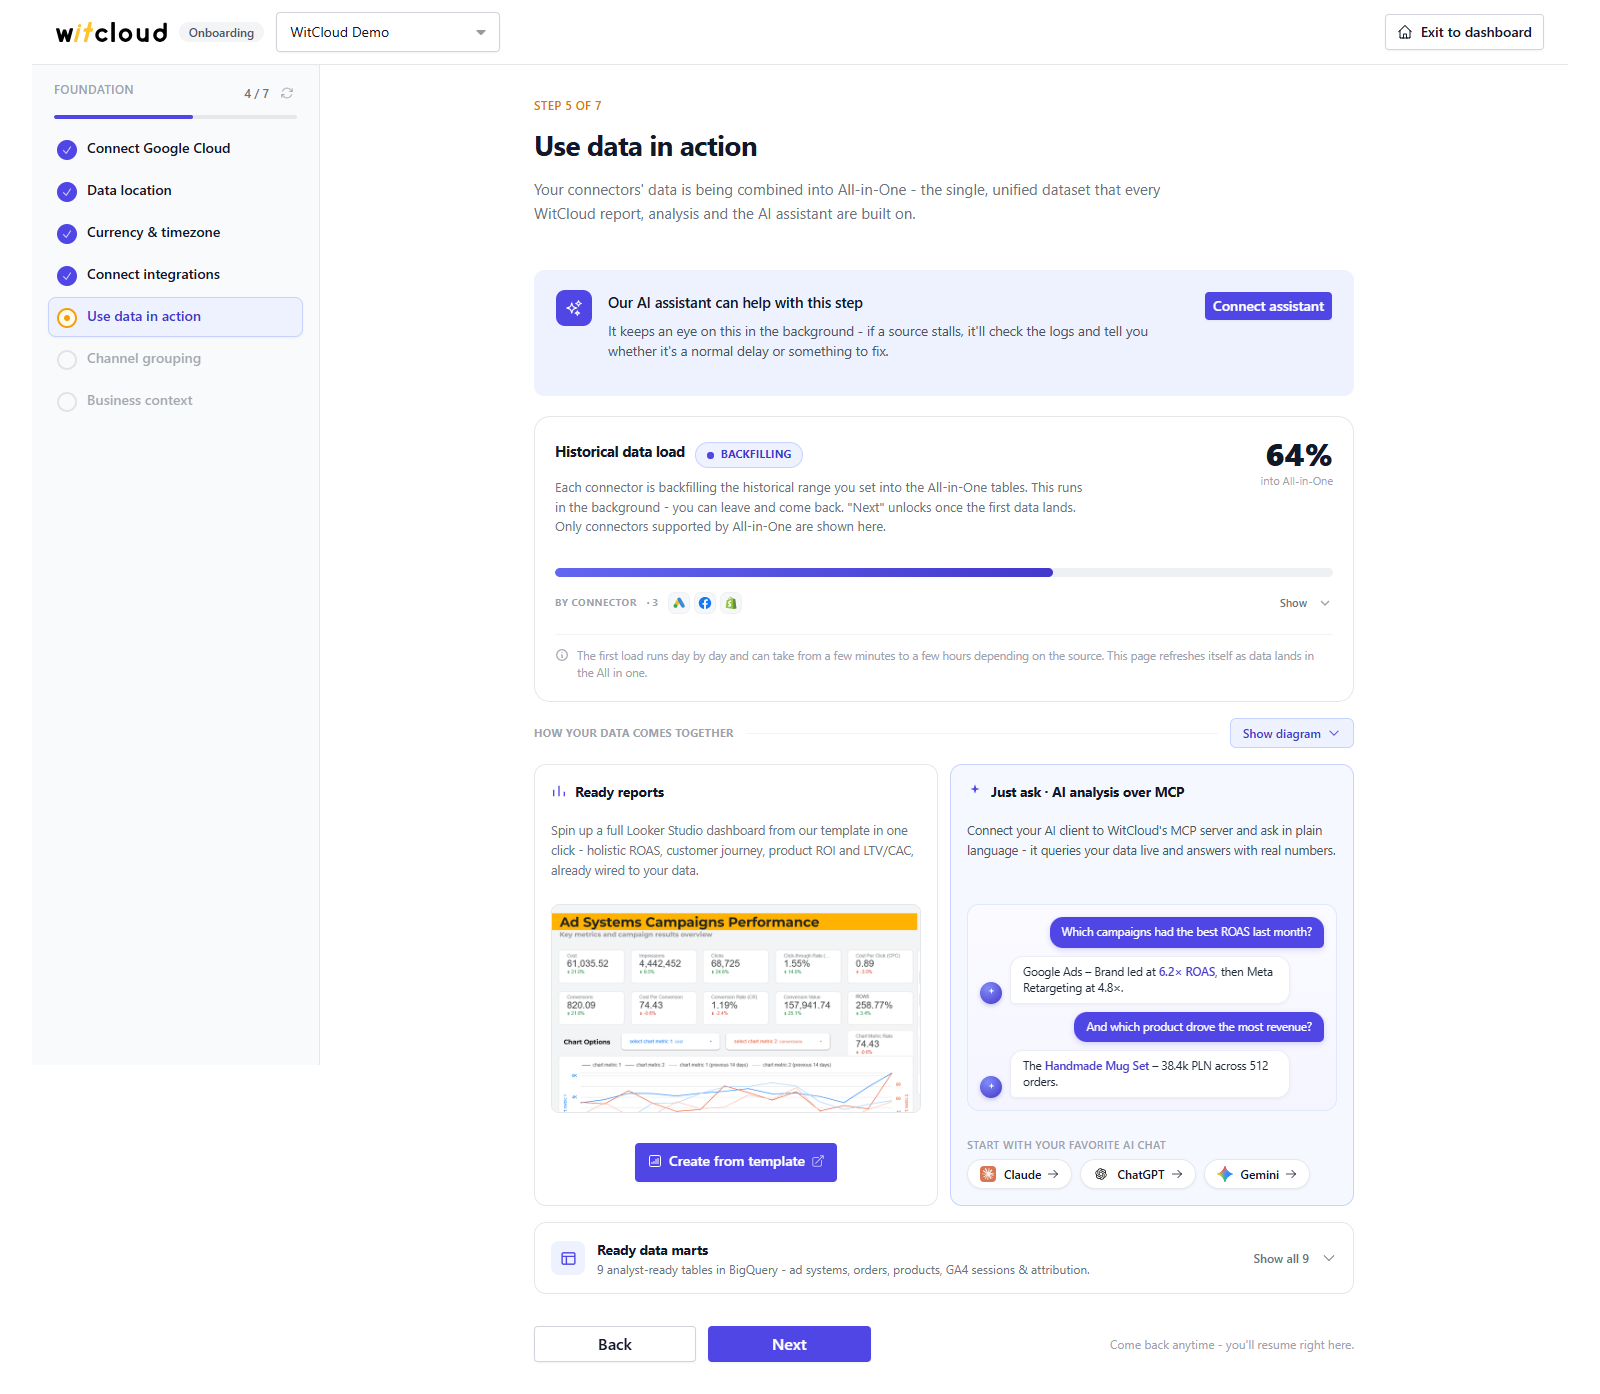
Below it you see what you can do with the data:
- Ready reports - Create from template creates a Looker Studio dashboard connected to your data.
- Just ask · AI analysis over MCP - connect your AI client and ask questions about your data in plain language (WitCloud MCP).
- Ready data marts - the nine All-in-One tables in your BigQuery: ad systems, orders, products, GA4 sessions and attribution. Show all 9 lists them, each with a link to open it in BigQuery.
Step 6: Channel grouping
Channel grouping sorts your traffic into marketing channels and, if you sell in more than one market, into markets. Every project has two groupings: Marketing channels and Market. Configure opens a grouping, with a link back to the onboarding. Details: Channel grouping.
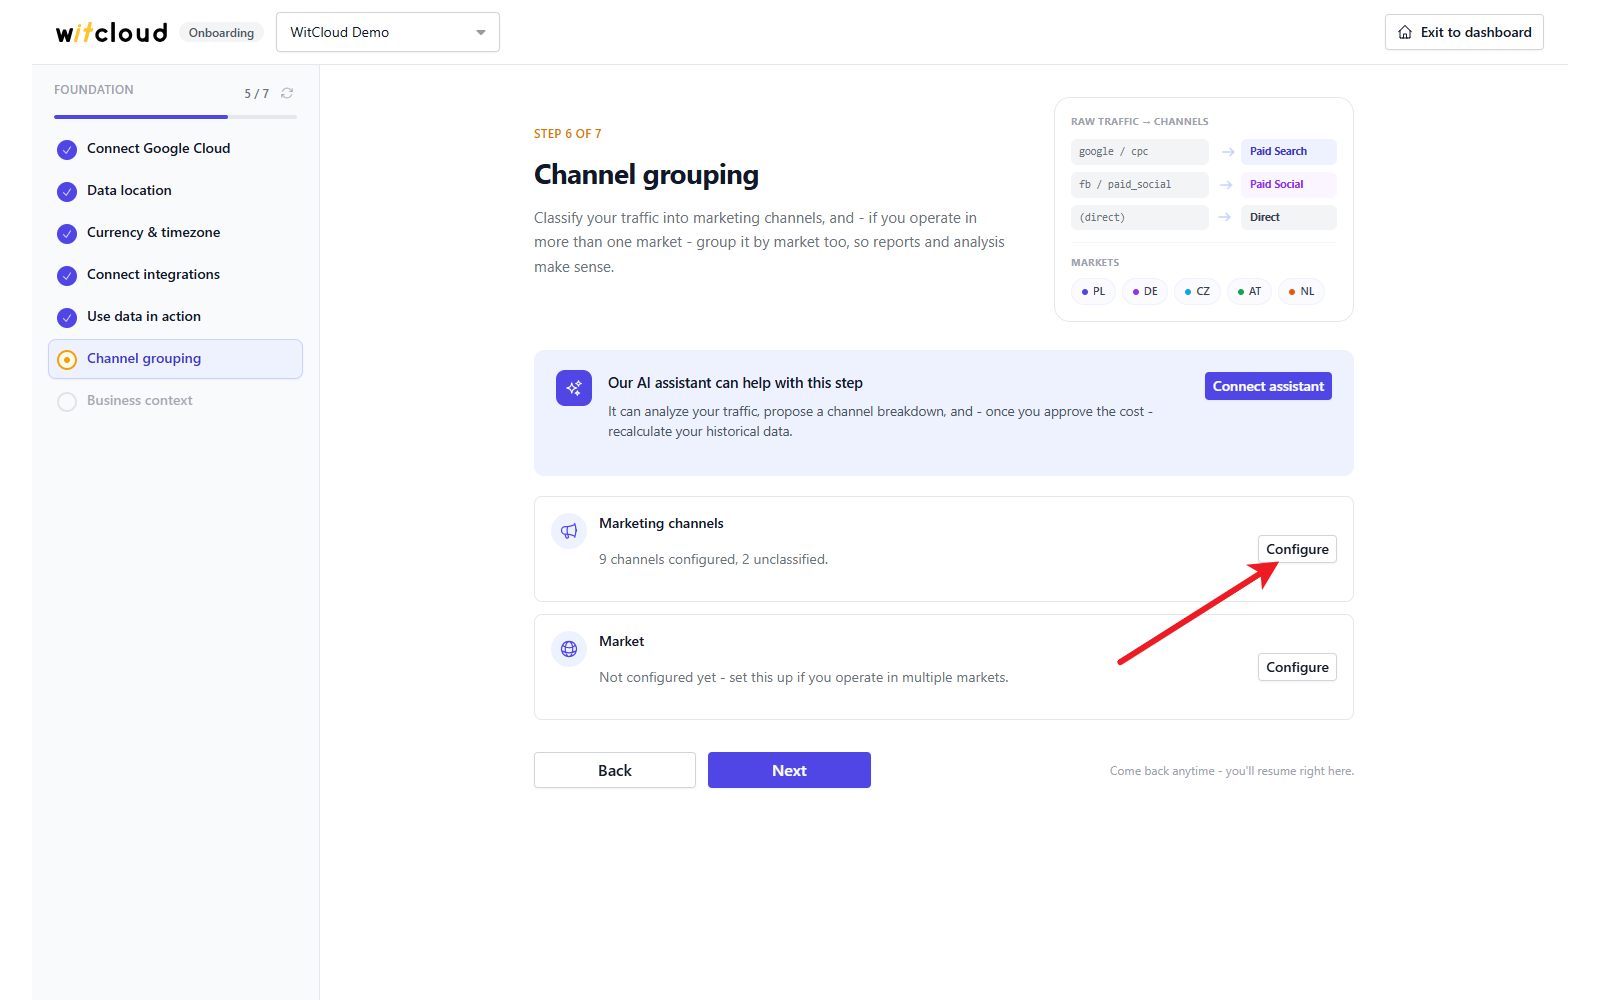
Click Next to continue.
Step 7: Business context
Describe your business - model, priorities, seasonality - so the AI assistant's analysis is specific to you. Click Create business context (or Configure next to an existing one) and write it, as described in Business context.
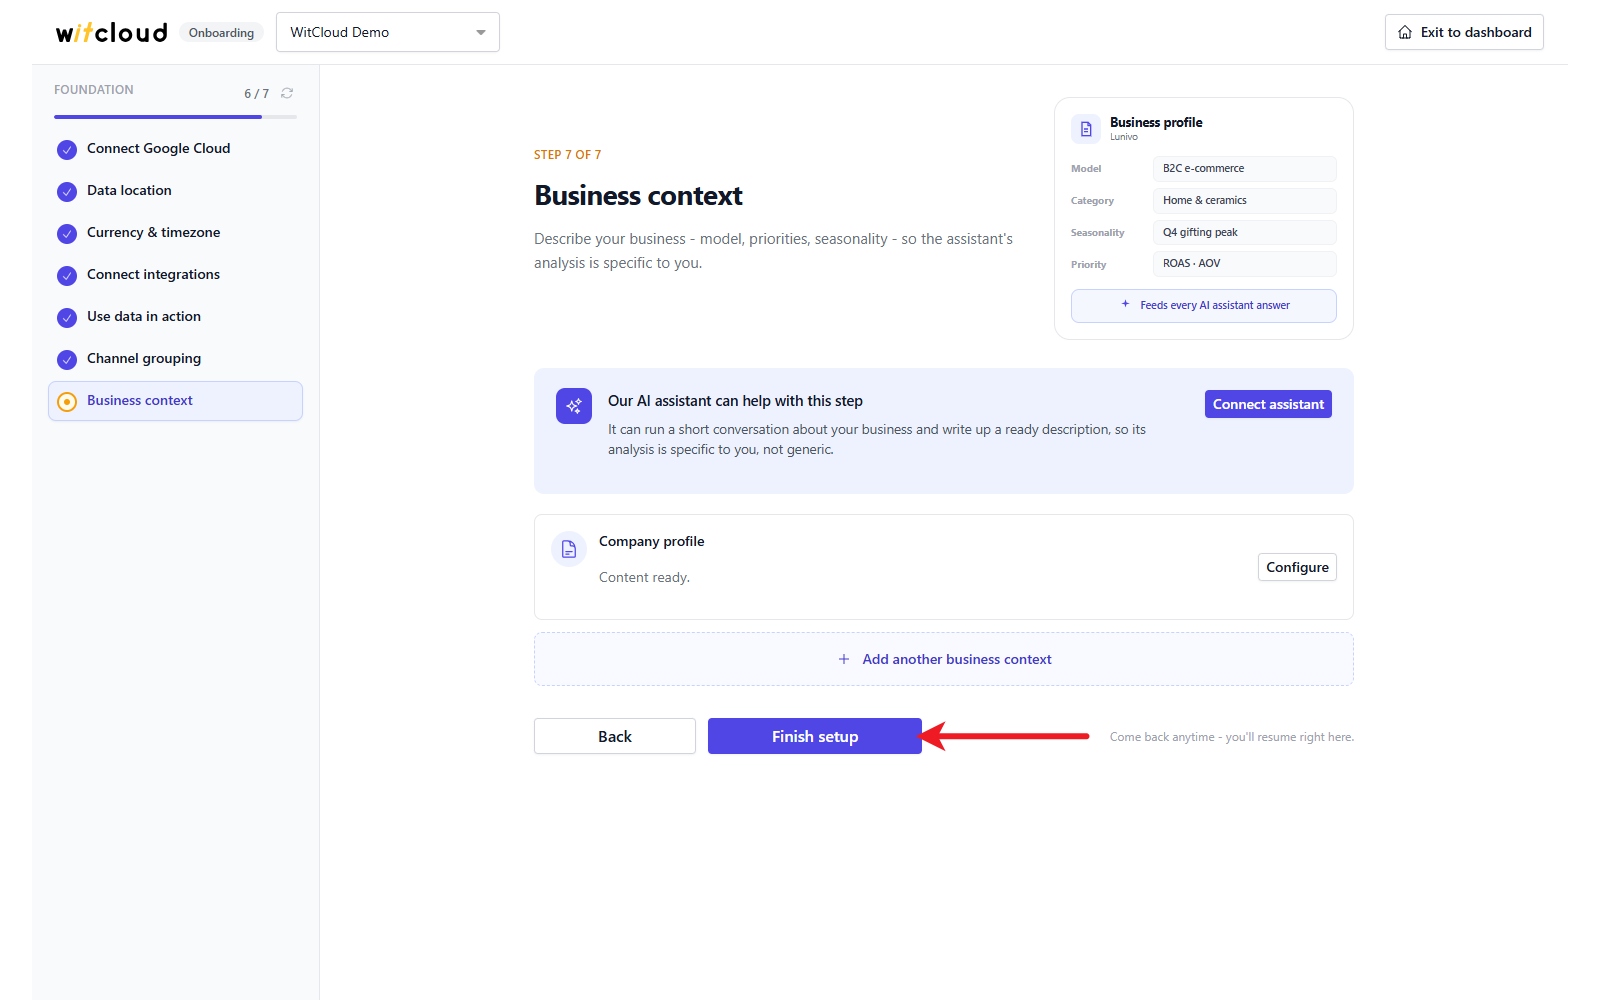
Click Finish setup. It needs at least one business context with content; without it the panel shows Create a business context with real content before finishing setup.
Done! You land on the dashboard, and your connectors keep collecting data every day.